


Creating Macros in Word
- Conor Jordan
- Jan 27, 2021
- 1 min read

Macros can be used in Microsoft Word to automate certain tasks such as formatting a document. Macros are helpful when the user repeats a series of tasks many times. When the macro is created, all the user has to do is click on the macro for the series of tasks to run.

Open a new document
On the Developer tab in the Code group, click on Record Macro

3. Name the Macro as “Table” and click OK
4. On the Insert tab in the Tables group, create a table with 4 columns and 3 rows
5. Format the table as Grid Table 4 – Accent 6
6. On the Table Tools Layout tab in the Data group, select Repeat Header Rows
7. On the Developer tab in the Code group, select Stop Recording
8. Save the document as “Macro”
Run a Macro
Open the “Macro” document
On the Developer tab in the Code group select Macros

3. Select Table and click on Run
4. This will run the macro and create the formatted table
5. Save the document
Creating a Custom Button
Open the “Macro” document
Right-click on an empty space on the ribbon
Choose Customize the Ribbon
In the Choose Commands From drop-down box choose Macros
Click on the New Group button to create a new group
Click on the Rename button
Change the name of the group to Macro
Click OK
Select the Macro and click on the Add button
Click on the Rename button
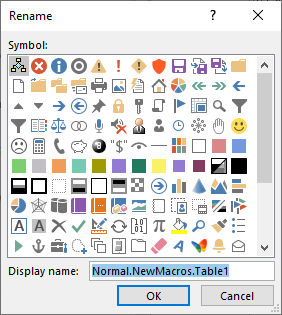
11. Choose a Smiley Face for the icon and change the Display Name to Table
12. Click OK
13. Click OK again
14. The Macro is now added to the Ribbon
15. Save the document
For more information about Advanced Word features, visit the Amazon link below:
Or visit www.digidiscover.com

To buy Office 365 visit Amazon: https://amzn.to/3qXl9M2


Comments